Posted by: Li Ling Young | October 28, 2020

Pandemic Thanksgiving

The pandemic of 2020 has involved a lot of loss.  As we approach Thanksgiving I know we won’t have the big family gathering that’s such a pleasure this time of year.  I imagine most American families will likewise miss one or many of their close relations that they might only see on Thanksgiving.  Jokes about avoided political conversation aside, this is another on the long, heartbreaking list of Losses of 2020.

So, when a close friend, whose kids are out of state, asked to join us for Thanksgiving this year, how could I say no?  We’re all hurting, and maybe we can share a little bit now while we hope for more togetherness in the future.  How to do this right: honoring the sacrifices we’re all making, minimizing risk and taking our joy where we can?  There’s a lot in the public space about groups, and I’m not going to focus on that.  In short, we’re keeping our gathering very small: Nik, myself, our son who lives a few miles away, and our friend who I see every week for dog walking.

What I’m going to describe below is managing virus transmission risk indoors.  We’ll be sitting down to share a meal: the riskiest way to socialize.

As part of my work on high performance and energy efficient homes I had a chance to talk to a longtime air quality researcher and advocate.  In the context of managing risk in public schools he said there are three things that are effective at reducing virus spread (keep in mind, this is in the context of low occupancy and mask wearing):

  1. Ventilation.  This means bringing in fresh air to dilute and remove pollutants and exhaled particles.  The amount of ventilation is important: to effectively reduce the potential for infection transmission minimum 40 cfm/person.  This is really only realistic in buildings that have a ventilation system.  For our Thanksgiving dinner, in a house without a ventilation system, we’re not going to be able do much about that.  If you have a ventilation system, turn it up!
  2. Filtering.  This one’s a bit easier, and below I explain how to do this in your house.  You need to filter for particles as small as one micron.  Filters are rated on the MERV scale.  A MERV 13 (or higher) filter will do the job.  Such filters are a little more expensive than your average filter, but they are readily accessible and available in pretty much any standard size.  If you have a furnace, you can put a MERV 13 filter in there, though it might restrict air flow to the point the furnace or your comfort suffers.  Buy one, try it out, watch for trouble.  If all is well, bulk buy for a better price.  If you don’t have a furnace, or your furnace can’t handle the MERV 13 filter, see below.
  3. Air disinfection.  This one requires an expensive device that may be hard to procure in the middle of a pandemic.  UV air cleaners come in many different varieties, from something that goes in a central HVAC system to something that sits on the floor like a dehumidifier.  Some treat the whole building, others just one room.  At my first dentist’s visit during the pandemic I found that they had a room-sized UV device in each examination room, mostly to protect the dental techs.  Bottom line with these is, if you feel like you need one, and you can find one to purchase, they are effective.  Know that they are expensive and needed for institutional settings more so than your home.

In an environment where people are indoors for an extended period of time, the combination of these three measures reduces the likelihood of infection to 30% of what it would otherwise be (remember, this assumes low occupancy and mask wearing).  No it’s not zero.  If you need zero, stay home and get your groceries delivered.

So, here’s what we’re going to do for Thanksgiving:

  • If it’s warm, we’ll dine outside.  Indoors everyone wears a mask.
  • Open a window downstairs and one upstairs.  Maybe two.  Depends on the weather.  Windy weather will help.  If you live in a mild climate, or have the type of fan that goes in a window, you can help get enough air flow by actively moving air through the open window.  Yes, we’ll lose heat and burn more fuel doing this: so be it.
  • Two homemade air filters.

That’s it.

Homemade air filter parts:

  • 20” box fan (the kind that sits on the floor.  I saw two at the local second hand store!  I also have a round fan that came with the new house.  I’ll cobble something together to make that work.
  • Five 20”X20”X1” MERV 13 furnace filters.  I bought a case of 12 online for about $100.
  • Wide masking- or packing tape (2” minimum)

With the airflow arrows pointing into the center of the box, assemble a box of the five filters, taping the sides for a seal.  Lap the corners so the open end of the box is the same size on all four sides.  Tape the box to the INFLOW side of the fan, again using enough tape to seal.  Make sure to leave the electrical cord on the outside.  Arrange the contraption so it can draw air into all five filters (put it on a chair, etc).  On low speed, pull air out of the room, into the filters and blow it into another room.  We’ll have one of these on either side of the dining room, blowing down the hall.

The absolute ideal scenario is having these contraptions near the ceiling, and allowing return air flow near the floor.  Realistically, I’ll probably put these at knee-level and the return air will just make its way around the fan: under and over.

Finally, there continues to be indications that coronavirus decays more rapidly with higher relative humidity, and stays viable longer with lower relative humidity.  From a building science point of view, this is bad for buildings in cold climates.  But now is the time to unambiguously choose human health over building durability and energy efficiency.  I don’t have a humidifier, but if I can get my hands on one between now and Thanksgiving I may add that into the freakshow of pandemic devices cluttering the dining room floor.

Find joy.  Stay safe.  With kindness, Li Ling and Nik
Posted by: Li Ling Young | February 5, 2017

Dust Blows

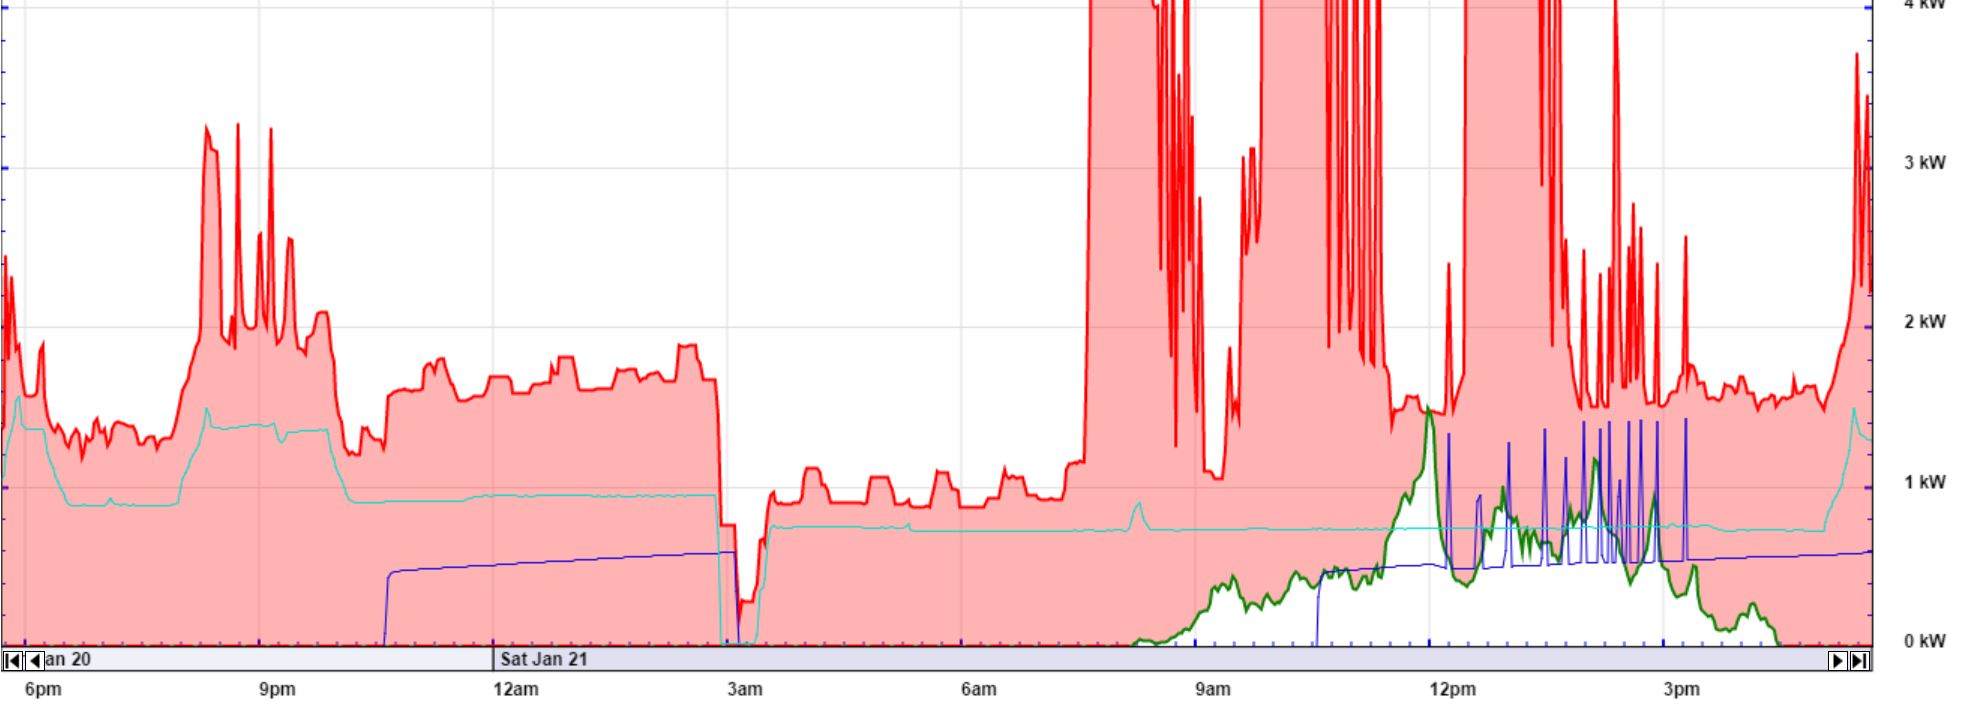
I don’t check our whole-home energy monitoring system several-times-a-day like I used to, so it was pure coincidence that I happened to catch this when I was computering the other day.

long-water-heater-cycle

A normal water heater cycle is shown in dark blue on the left. A freakishly long water heater cycle is shown in dark blue on the right. Spikes in the water heater power is likely the electric resistance element coming on to help the heat pump.

There’s a lot going on in this graph, but focus on the dark blue shapes.  That shows when the water heater came on, how long it stayed on and how much power the water heater is drawing.  The water heater cycle that starts around 10:30 pm goes on for 7.5 hours!!  What? Too much.  The cycle on the left is more normal for this time of year.  In the summer when the basement is warmer the water heater cycle is a little shorter.  But 7.5 hours to reheat itself after we… what? washed dishes?

Actually, I didn’t really question it much when I first saw that.  But a couple of days later I happened to glance at the water heater and saw this

img_20170128_125142862

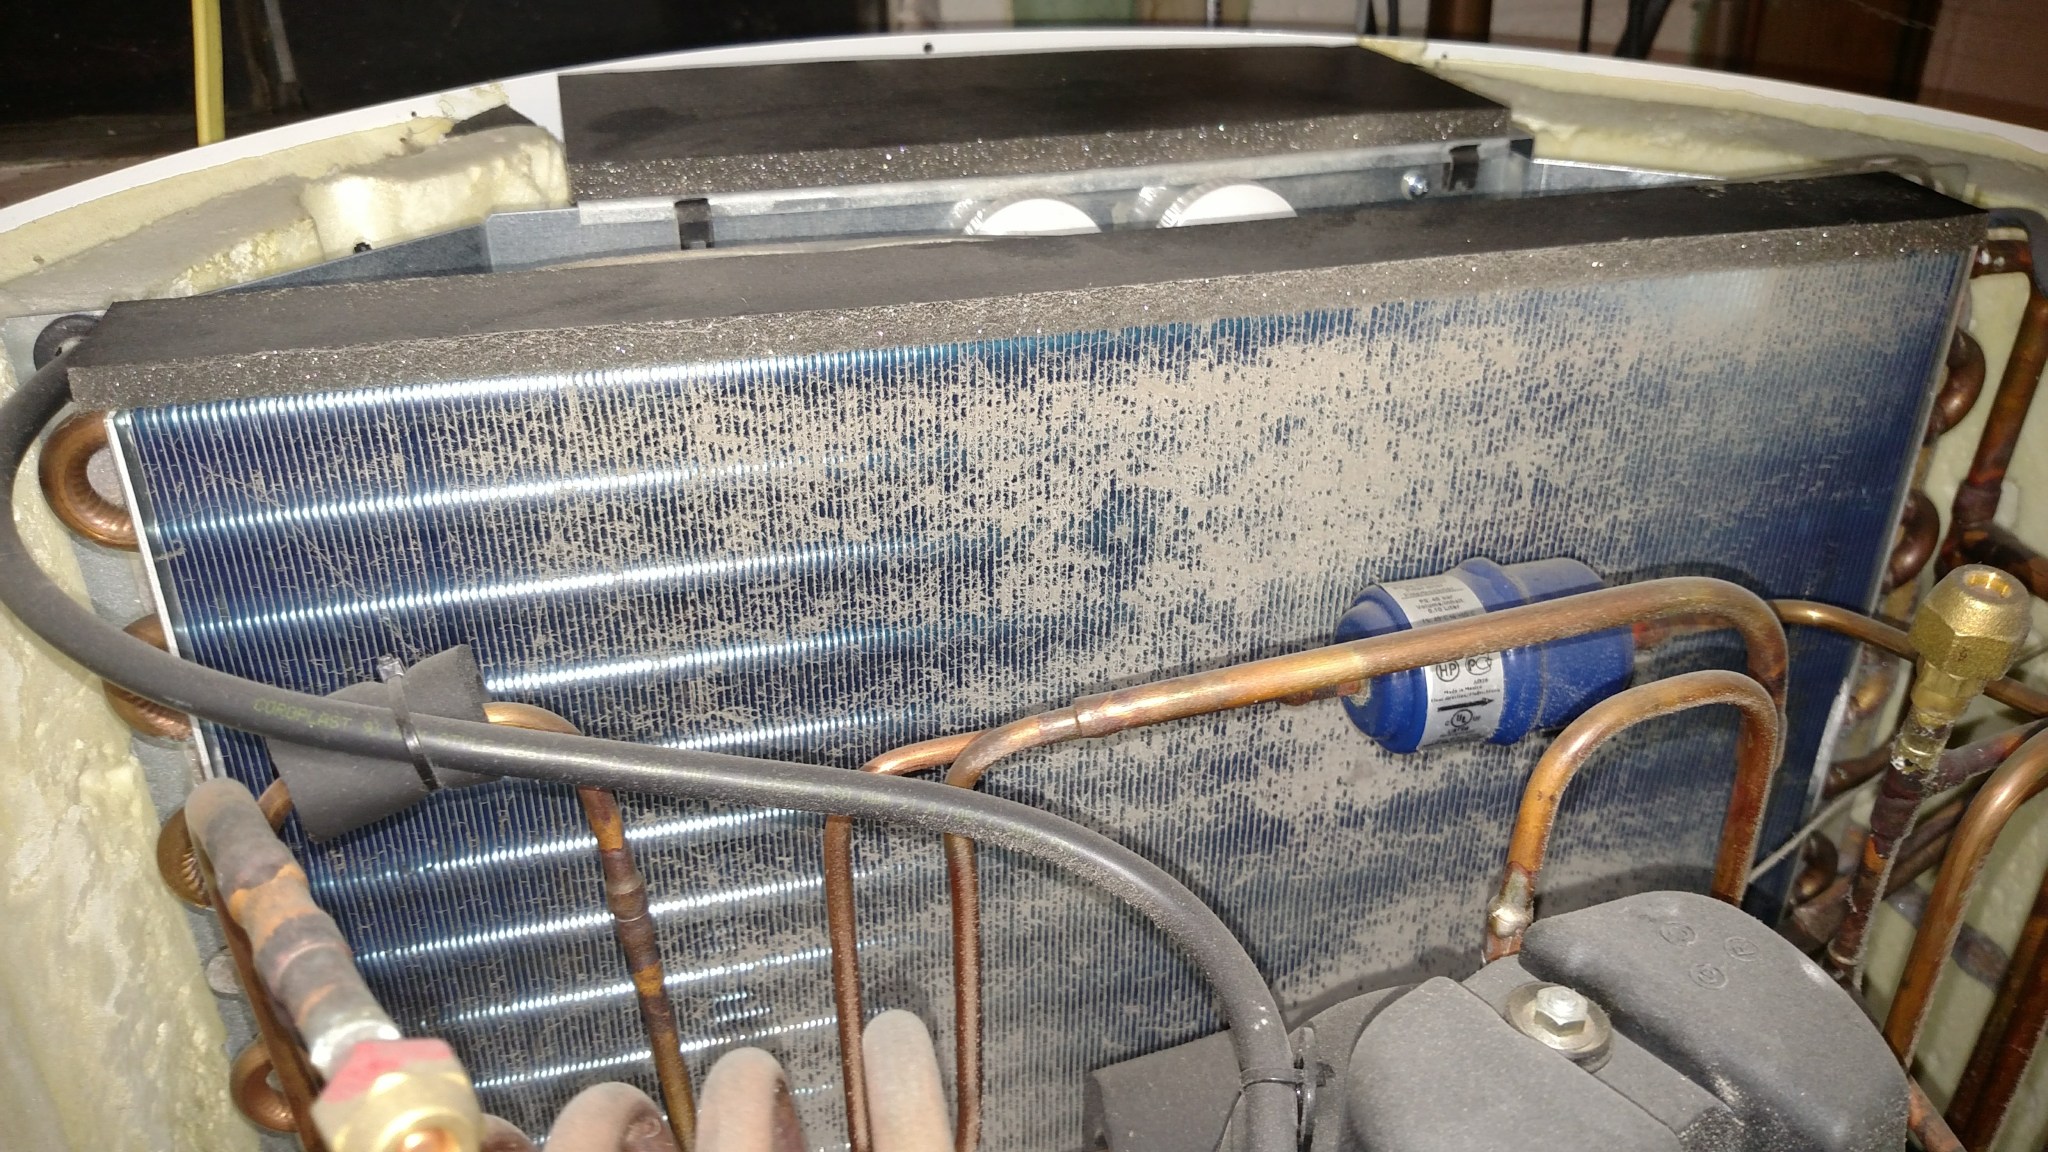
Dust accumulating in the heat pump water heater.

That’s dust on the fins in the heat pump that makes our hot water.  For a primer on heat pumps, see this post.  The fins are where energy in the air is transferred to the refrigerant.  A lot of air has to move through the fins to deliver enough energy to make hot water. There’s just a teensy space between the fins, and as we are discovering dust can get caught on the way through.  What’s the problem?  As the space through the fins gets clogged up the fan that blows air through there has to work longer to deliver enough energy to the heat pump.  At this point, as I’m standing in the basement contemplating the dusty water heater I remember the thing I saw on our whole-home energy monitor: a long, long water heater cycle.  This dust is doubling the amount of energy our water heater uses.

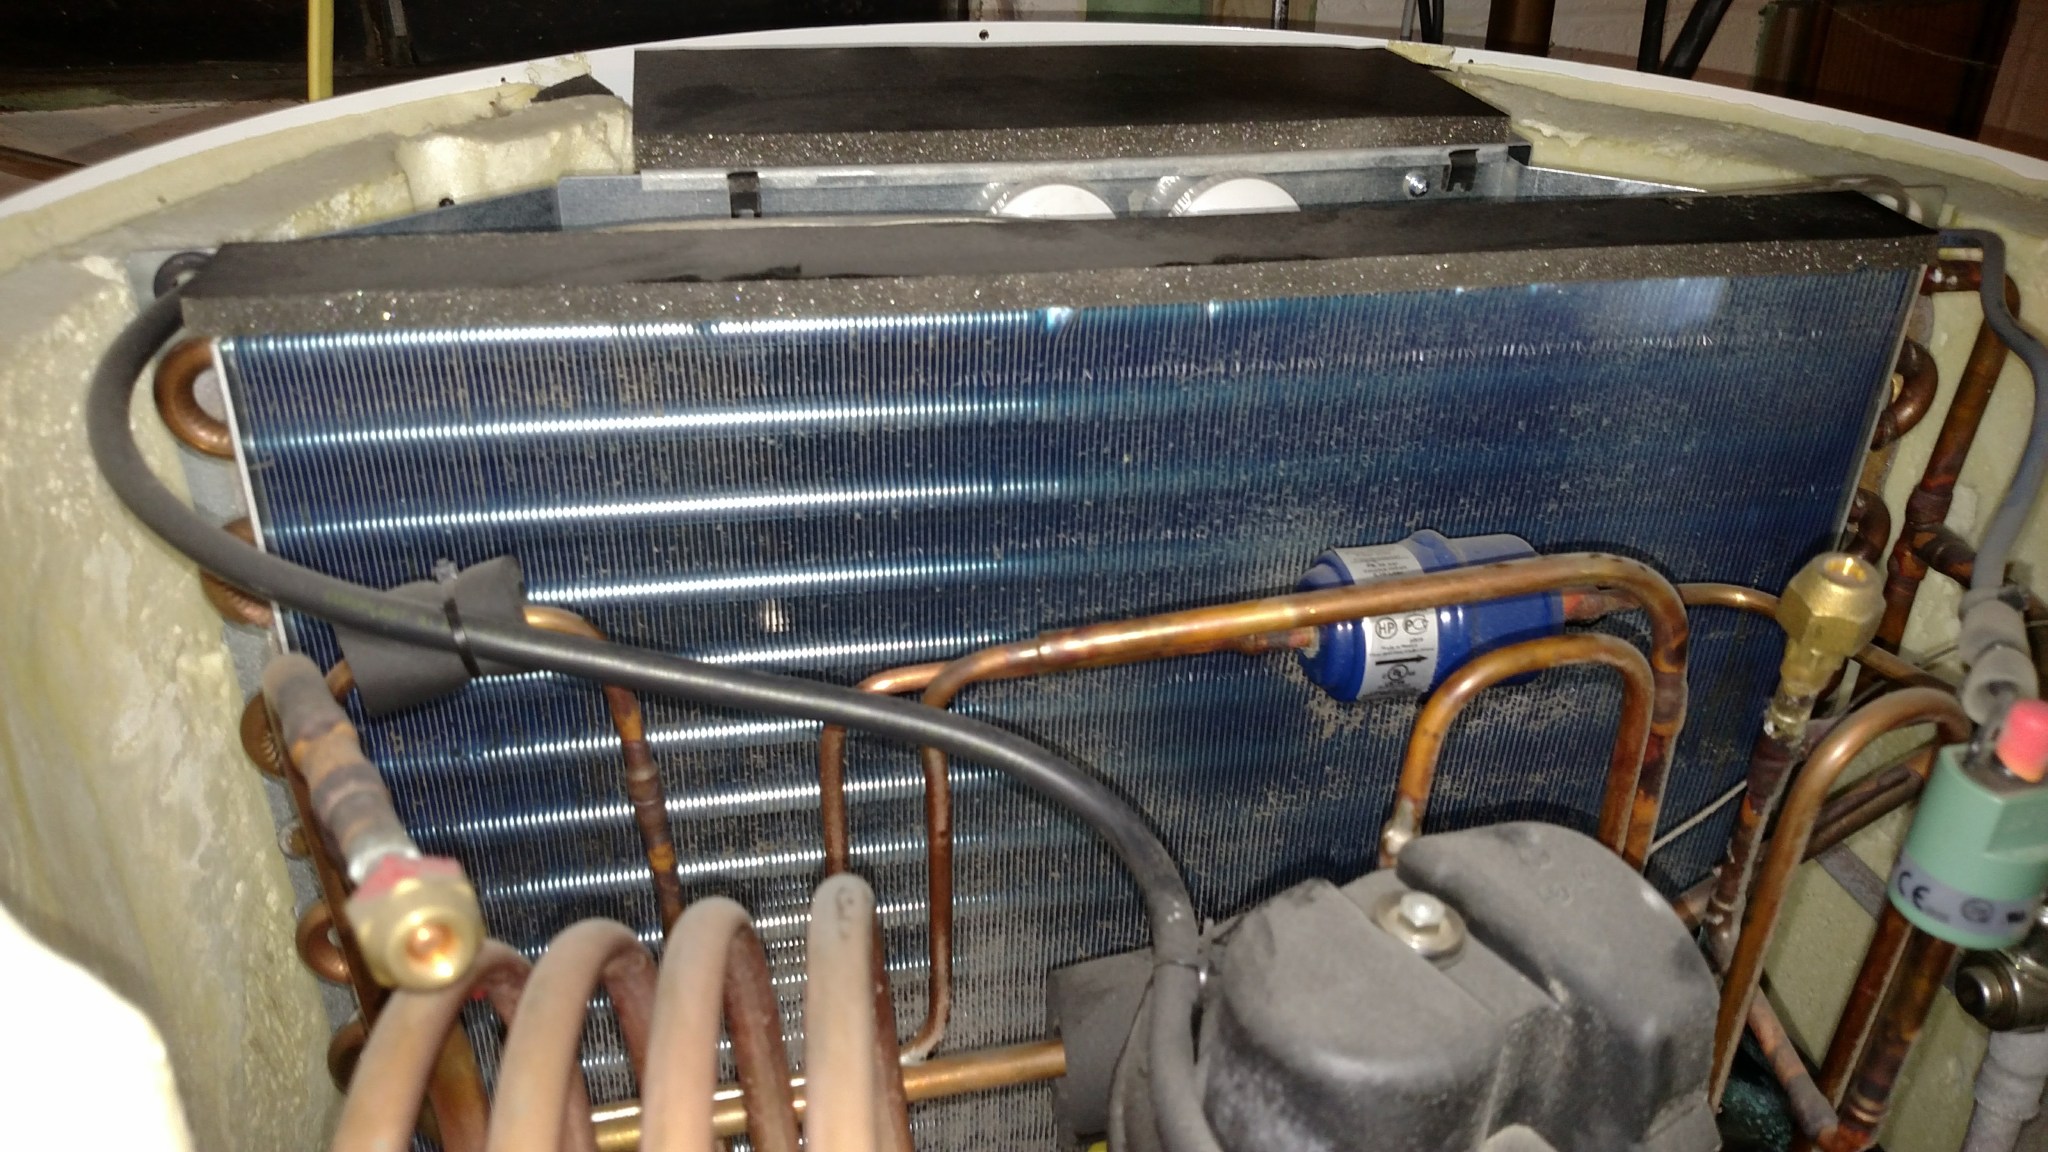
Nik got on a stool and vacuumed the fins.  If you try this at your house, be careful!  The fins are easily damaged.  Use the brushy attachment on your vacuum.  Here’s a shot after Nik’s work.

img_20170128_130616685

The water heater after a vacuuming-out. Cleaner fins equals better efficiency.

What you can’t see is the lower part of the fin-assembly, hidden behind the black box.  That part is still gunked up and there is absolutely no way to get at it with the vacuum.  I asked the Stiebel Eltron manufacturer’s representative about that a couple of days later and he said, “It’s supposed to be self-cleaning.”  I pointed out that all other heat pump water heaters have a filter over the heat pump compartment.  A real let-down from a company from whom I expect top-notch engineering. Later an old timer-heating installer told me to use compressed air to blow it out.

Since the cleaning we’ve had a few more very long water heater cycles.  Guess the dirty fins weren’t the whole story.  Or maybe it’ll right itself once we blow out the rest of the fins.

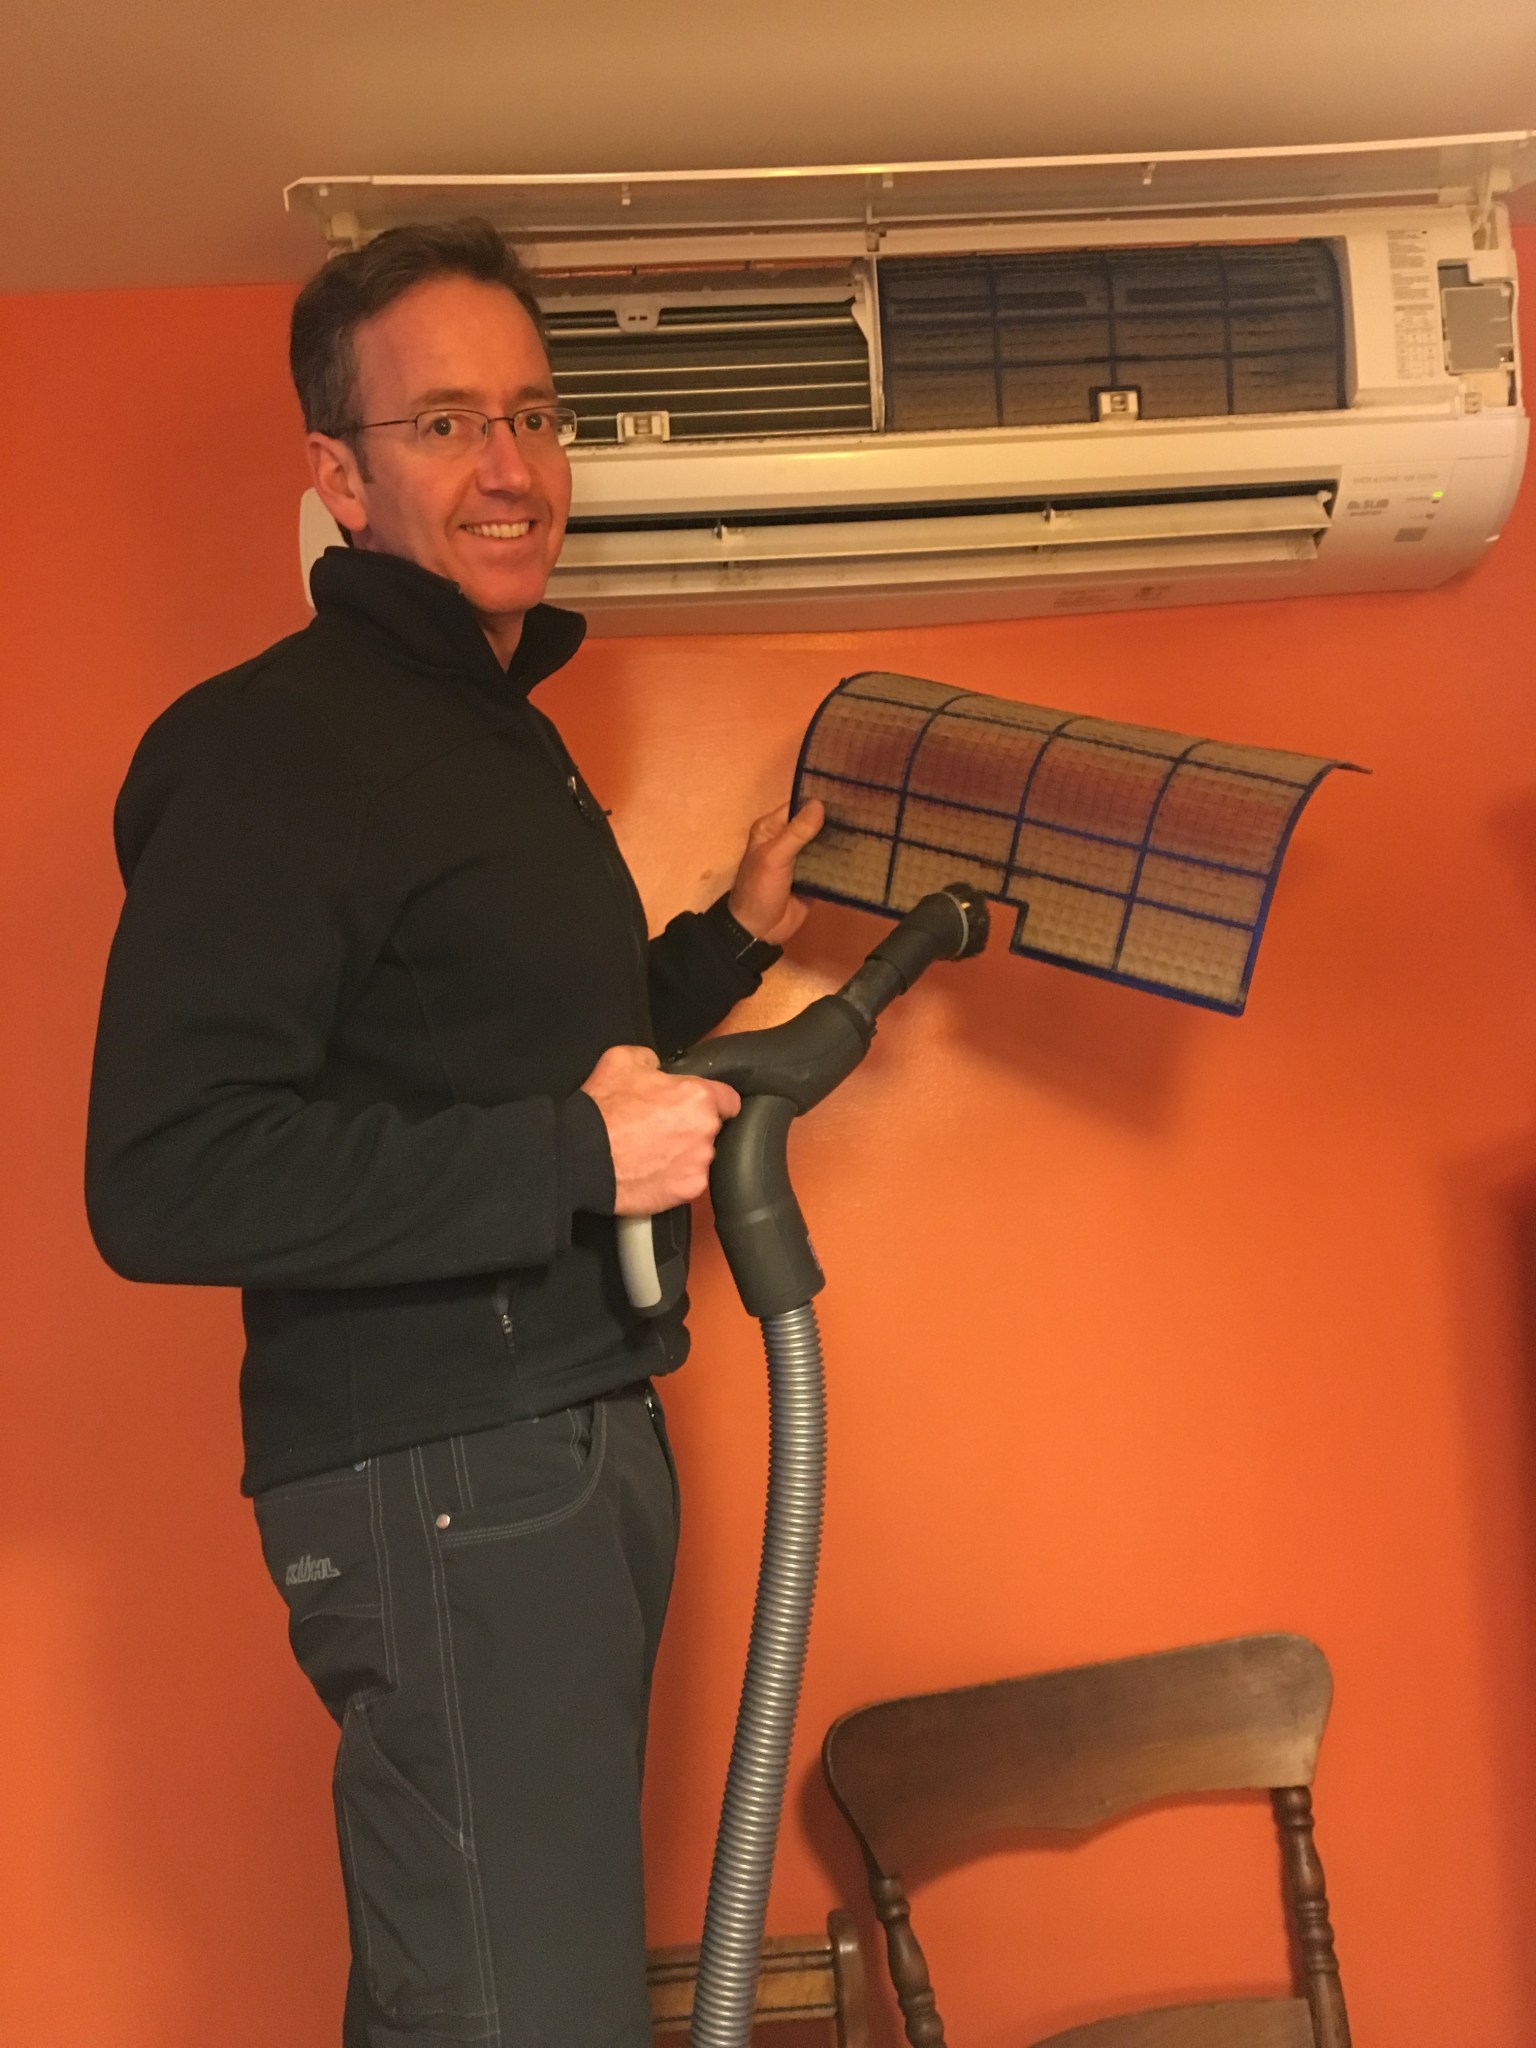
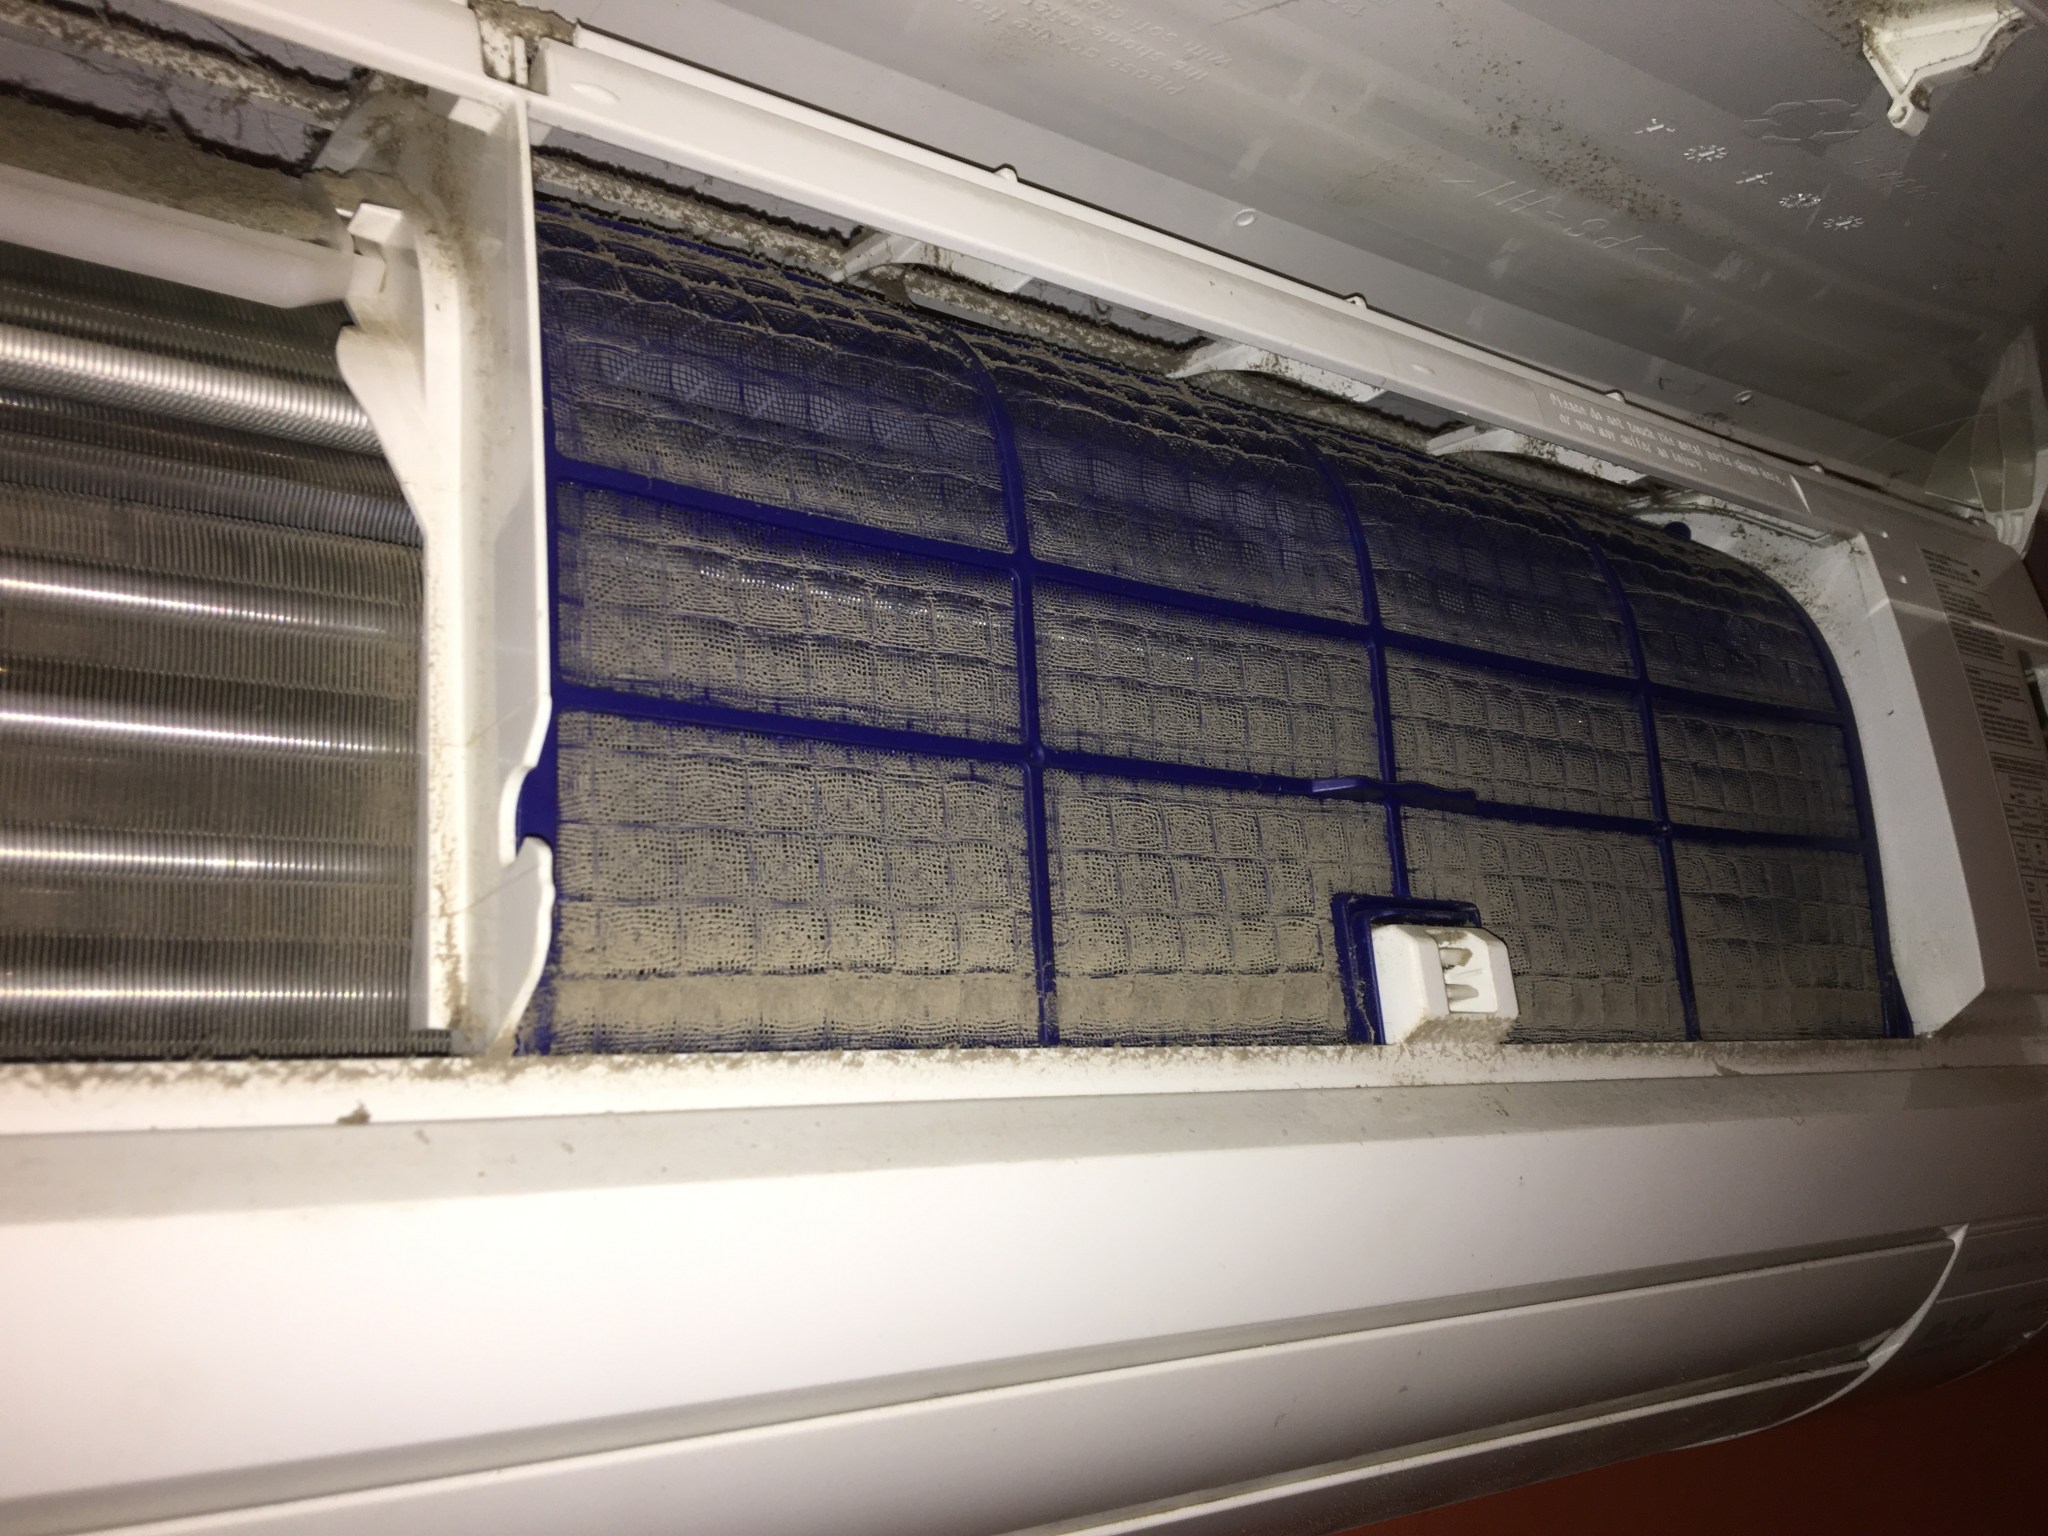
Today I was in a funk and was casting about for some comfort cleaning.  Nik said he hadn’t cleaned the filters on the mini-split heat pump lately and offered to show me how he does it.  Just like the heat pump water heater, the mini-split blows air through a fin assembly to move air in and out of the refrigerant.  Unlike the the water heater, filters protect fins from getting clogged up with dust.  Nik cleans them every month in the winter.

img_23201

Nik cleans our mini-split filters because it keeps the mini-split working well, and all that dust is icky: get it out!

img_23221

Oooh, yeah. Filters need attention. I guess I should be glad the mini-split has these filters. It keeps our air cleaner!

Heat pumps need a little care.  Not much, really.  The consequences of neglecting them is lower performance and higher energy use.  We want the opposite, so we’re happy to keep up with whatever the heat pumps need.

Posted by: Li Ling Young | January 29, 2017

This Kind of Wall

Sometimes you look back in history and say to yourself, if I was there I would have… Sheltered Jews, Protected Japanese neighbors’ property, Befriended the only black children in the school…  This history, being made right now, is our chance to be on the right side of justice, to be the citizens we will wish we had been and to make our children proud when we tell them what we did when democratic institutions were burning.

In 2017 this is the kind of wall I want.  It’s cheaper than a border wall.  It fights climate change.  It pays for itself.  And it’s made in the USA!

After several years of planning we are adding insulation to the outside of our walls.  Since our house, like most houses in the US, has 4″ walls, there isn’t much room to work with when it comes to insulating.  For more than 4″ of insulation we need to take space on the inside of the wall or on the outside.  Obvious disadvantages of adding insulation to the inside: very expensive to restore the finishes; we’re living here and don’t want to deal with construction mess/displacement; makes the rooms smaller.  Obvious advantage of adding insulation to the outside: chance to replace the 60+ year-old siding that was damaged when we had the walls densepacked.  Other pros and cons are not listed here, but suffice it to say that these were the compelling factors

Why even bother?  As Nik has pointed out more than once, we’re already providing all our household energy with our solar system (and about a cord of wood a year – which you can count  under the zero energy column or not per your attitude toward the renewability and sustainability of burning wood).  If we “save” energy by becoming more efficient, we’re not going to save any money, and we’re not even going to reduce pollution/forestall climate change.  What are we gaining by making our home better insulated?  Comfort! What I have pointed out more than once is this home is the worst kind of zero energy home: uncomfortable.  Because heat is provided only in the dining room, parts of the house far from the mini-split or woodstove are cooler than the core of the house.  The colder the weather, the cooler the bedrooms until it gets fully cold in our bedroom and bathroom.  I’ve seen it below 50 deg F in our bathroom: time to shower at the gym.

The design of the new wall is, in my opinion, an improvement on every thickened-wall strategy I’ve seen, even the cherished Larson Truss.  Nonetheless, it’s not really what I wanted.  One of my objectives was to design a foam-free wall because spray foam is dangerous for the installer and is made with chemicals that contribute to climate change.  My wall has a little bit of foam in it.  I also wanted to leave the original siding in place so as to not disturb the lead paint.  Got talked out of that because it makes the construction easier to have the old siding out of the way.  Here’s what makes it a superior way to add insulation to the walls in an existing home:

  • minimal foam
  • faster to assemble than Larson Truss
  • good structural design
  • relatively few expensive fasteners
  • nailbase
  • easy to hang windows and trim

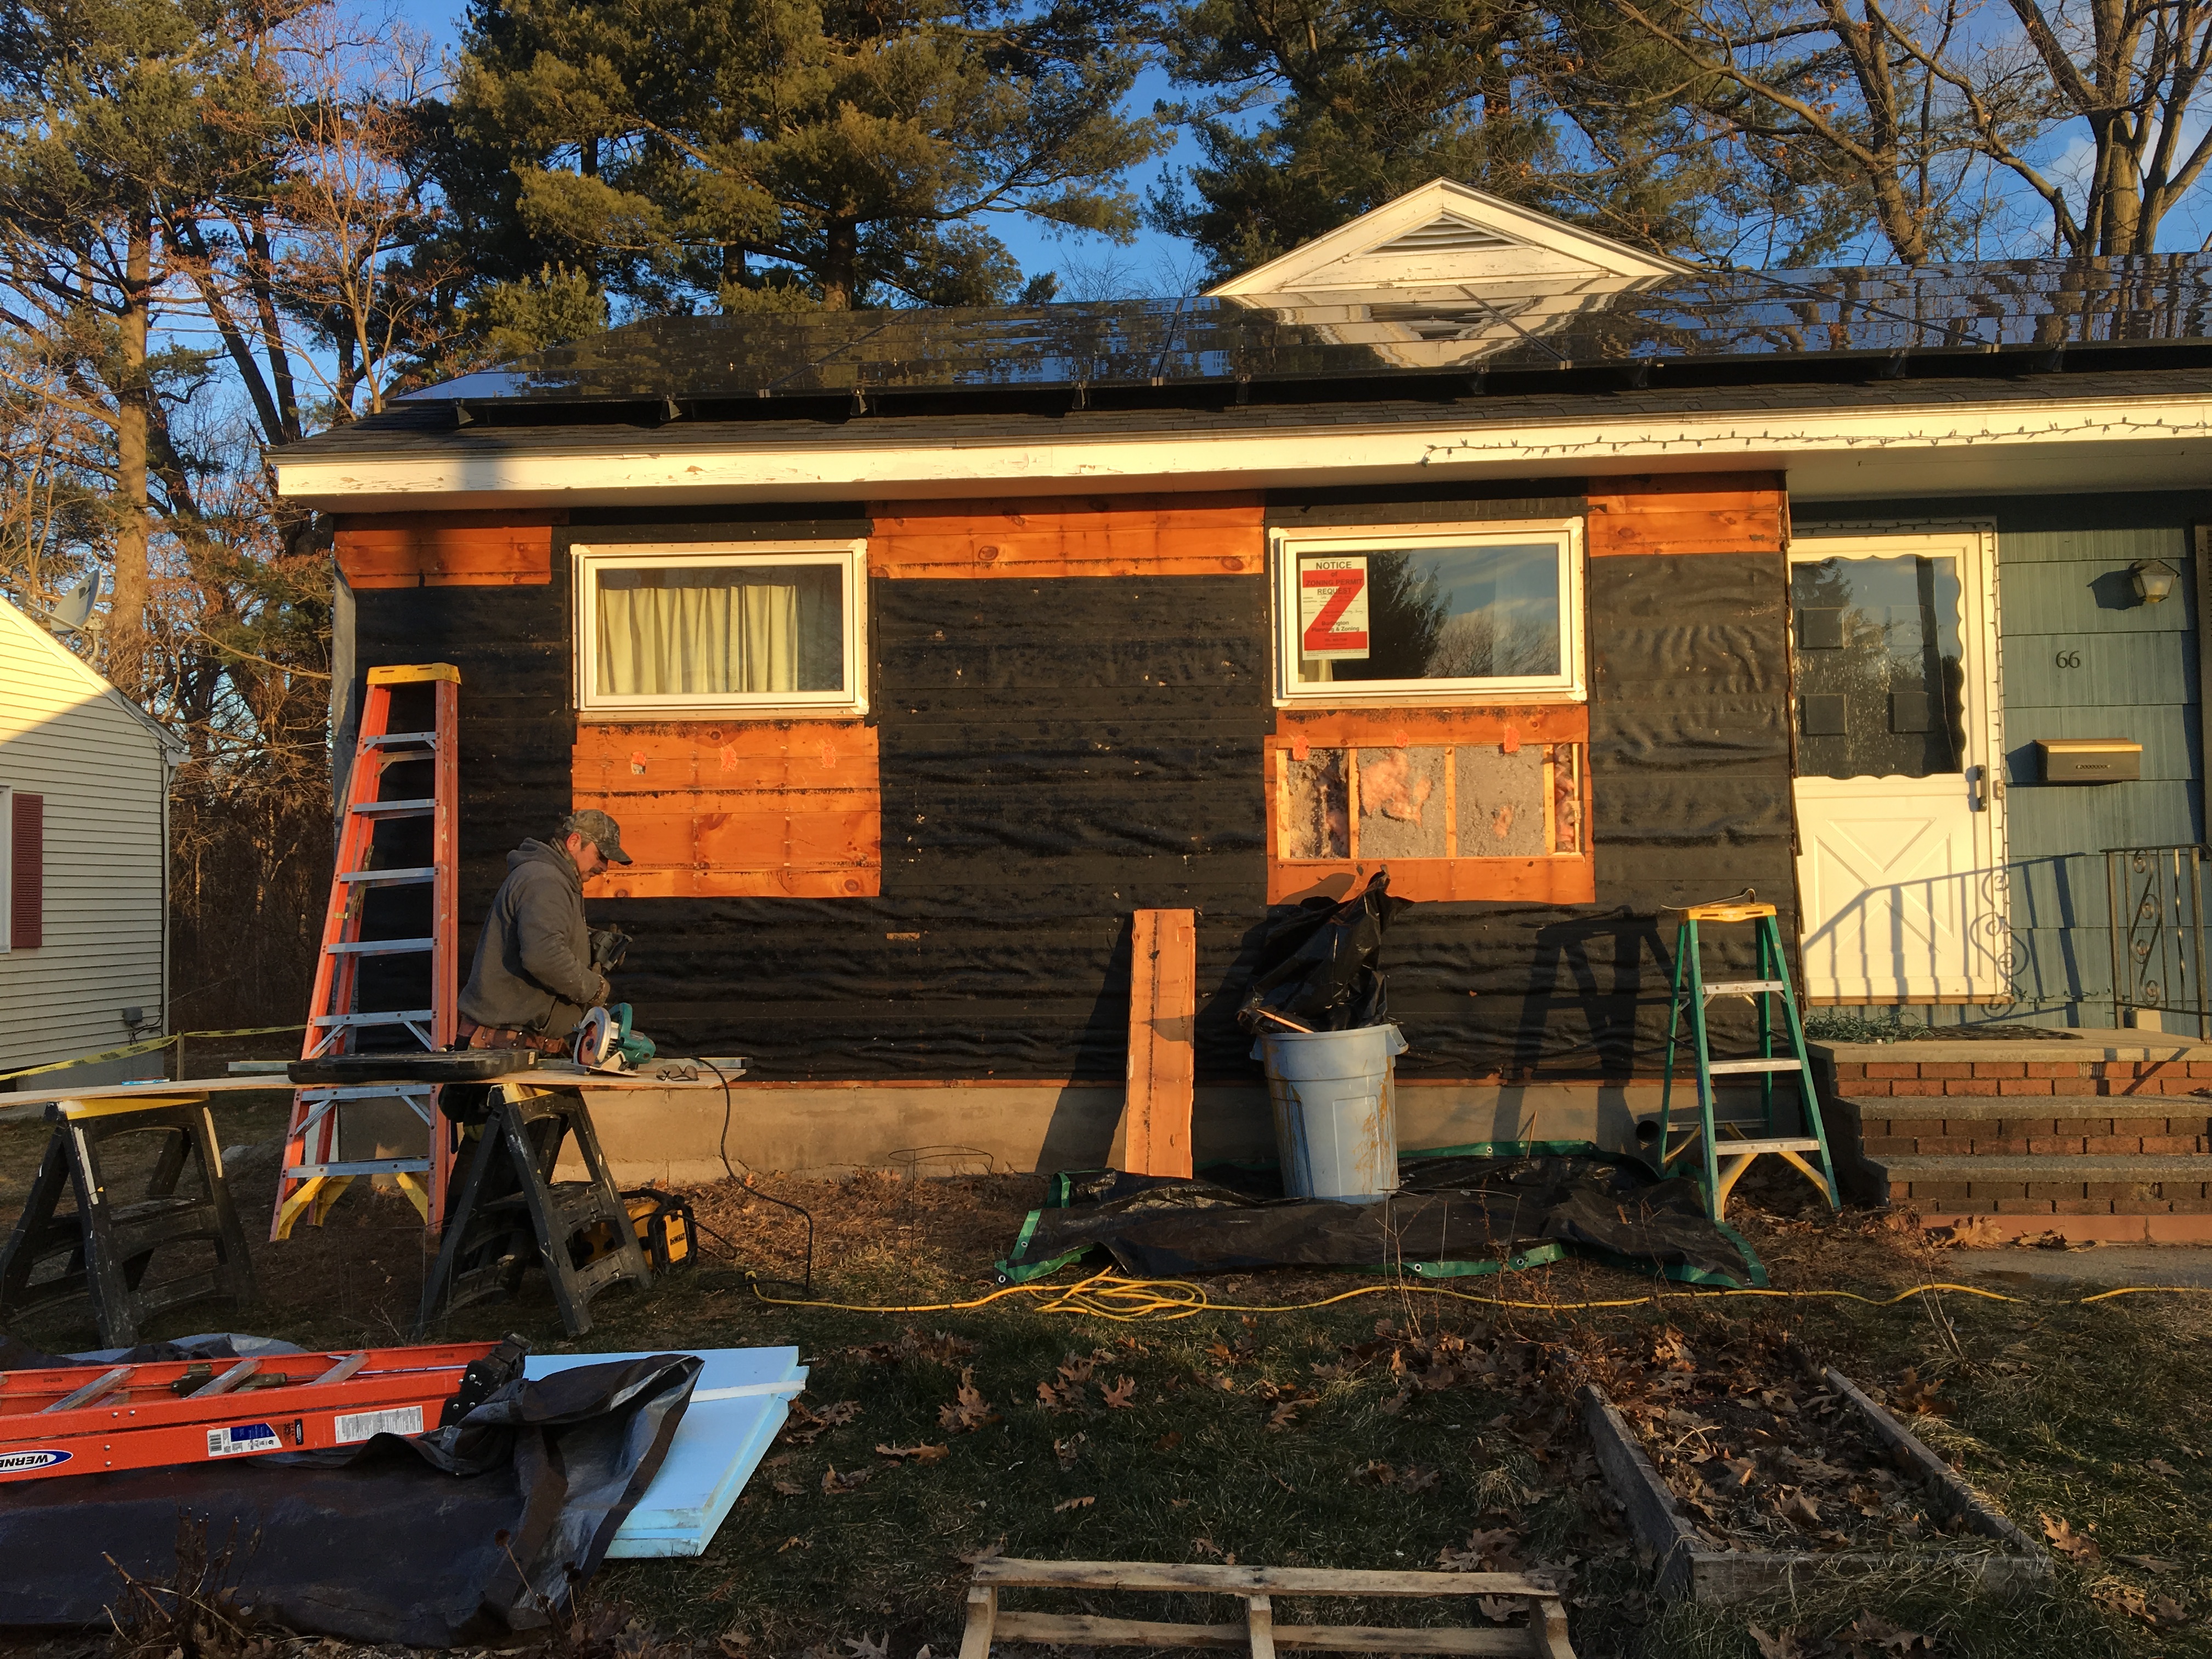
Step One – Our awesome builder, Ed, removed all the siding on two walls by himself in two days (including cleanup and disposal).  He also framed in the opening for the larger windows that will go on the south side.  We were able to check in on the densepack job that was done four years ago.  From what we saw, good fill but not that dense.  You can also see there was a narrow bay that was missed entirely.

img_2165

The windows on the south side of the house will be enlarged to let the bedrooms load up on solar heat in the winter and to provide egress. Sheathing removed shows the cellulose that was added to the walls a few years ago and the fiberglass batt that originally insulated the house.

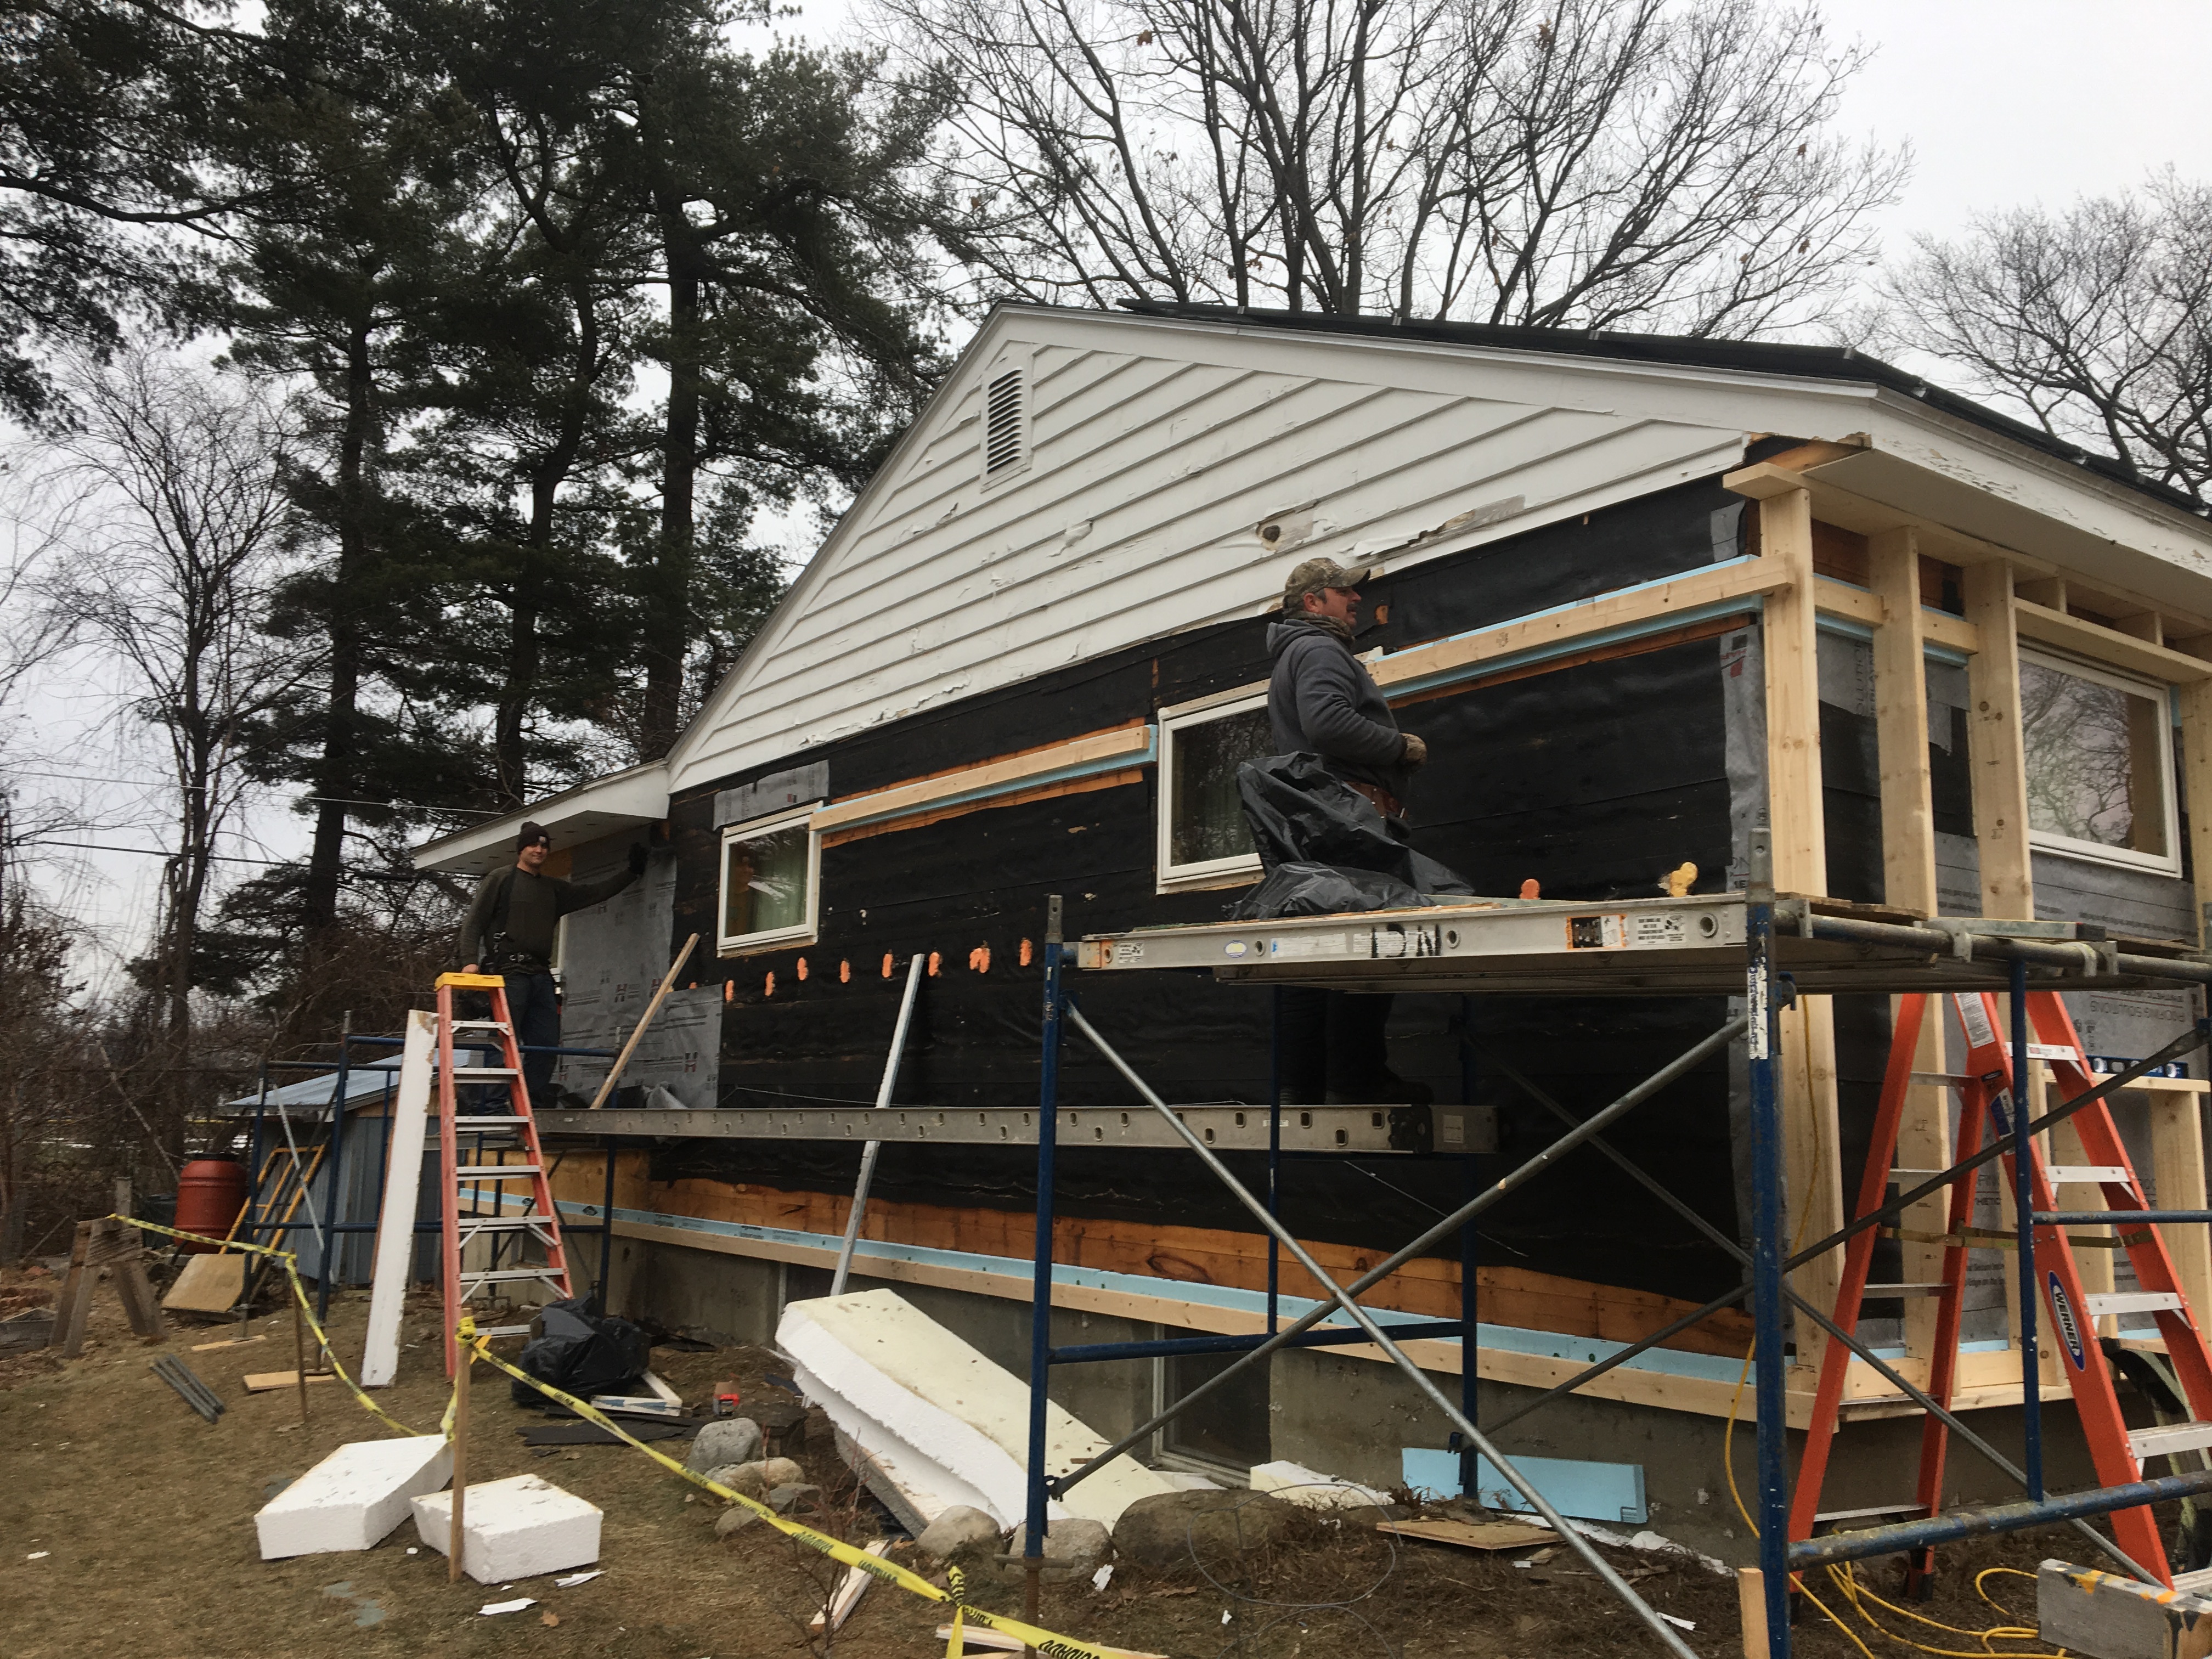
Step Two – Ledgers are mounted on the wall.  An inch-and-a-half of polystyrene foam board is behind the ledger to provide a continuous insulation layer and make even more space for insulation.  Originally I asked for a 2X8 to be added to the wall, but with this 1.5″ of foam board behind the ledgers only a 2X6 is needed – saving trees!  The ledgers are attached with very long screws through to the structural 2X4 in the original wall.  These are the only long screws required in the whole assembly.

After the siding is removed ledgers are mounted to wall with 1.5

After the siding is removed ledgers are mounted to wall with 1.5″ of rigid foam board as a spacer.

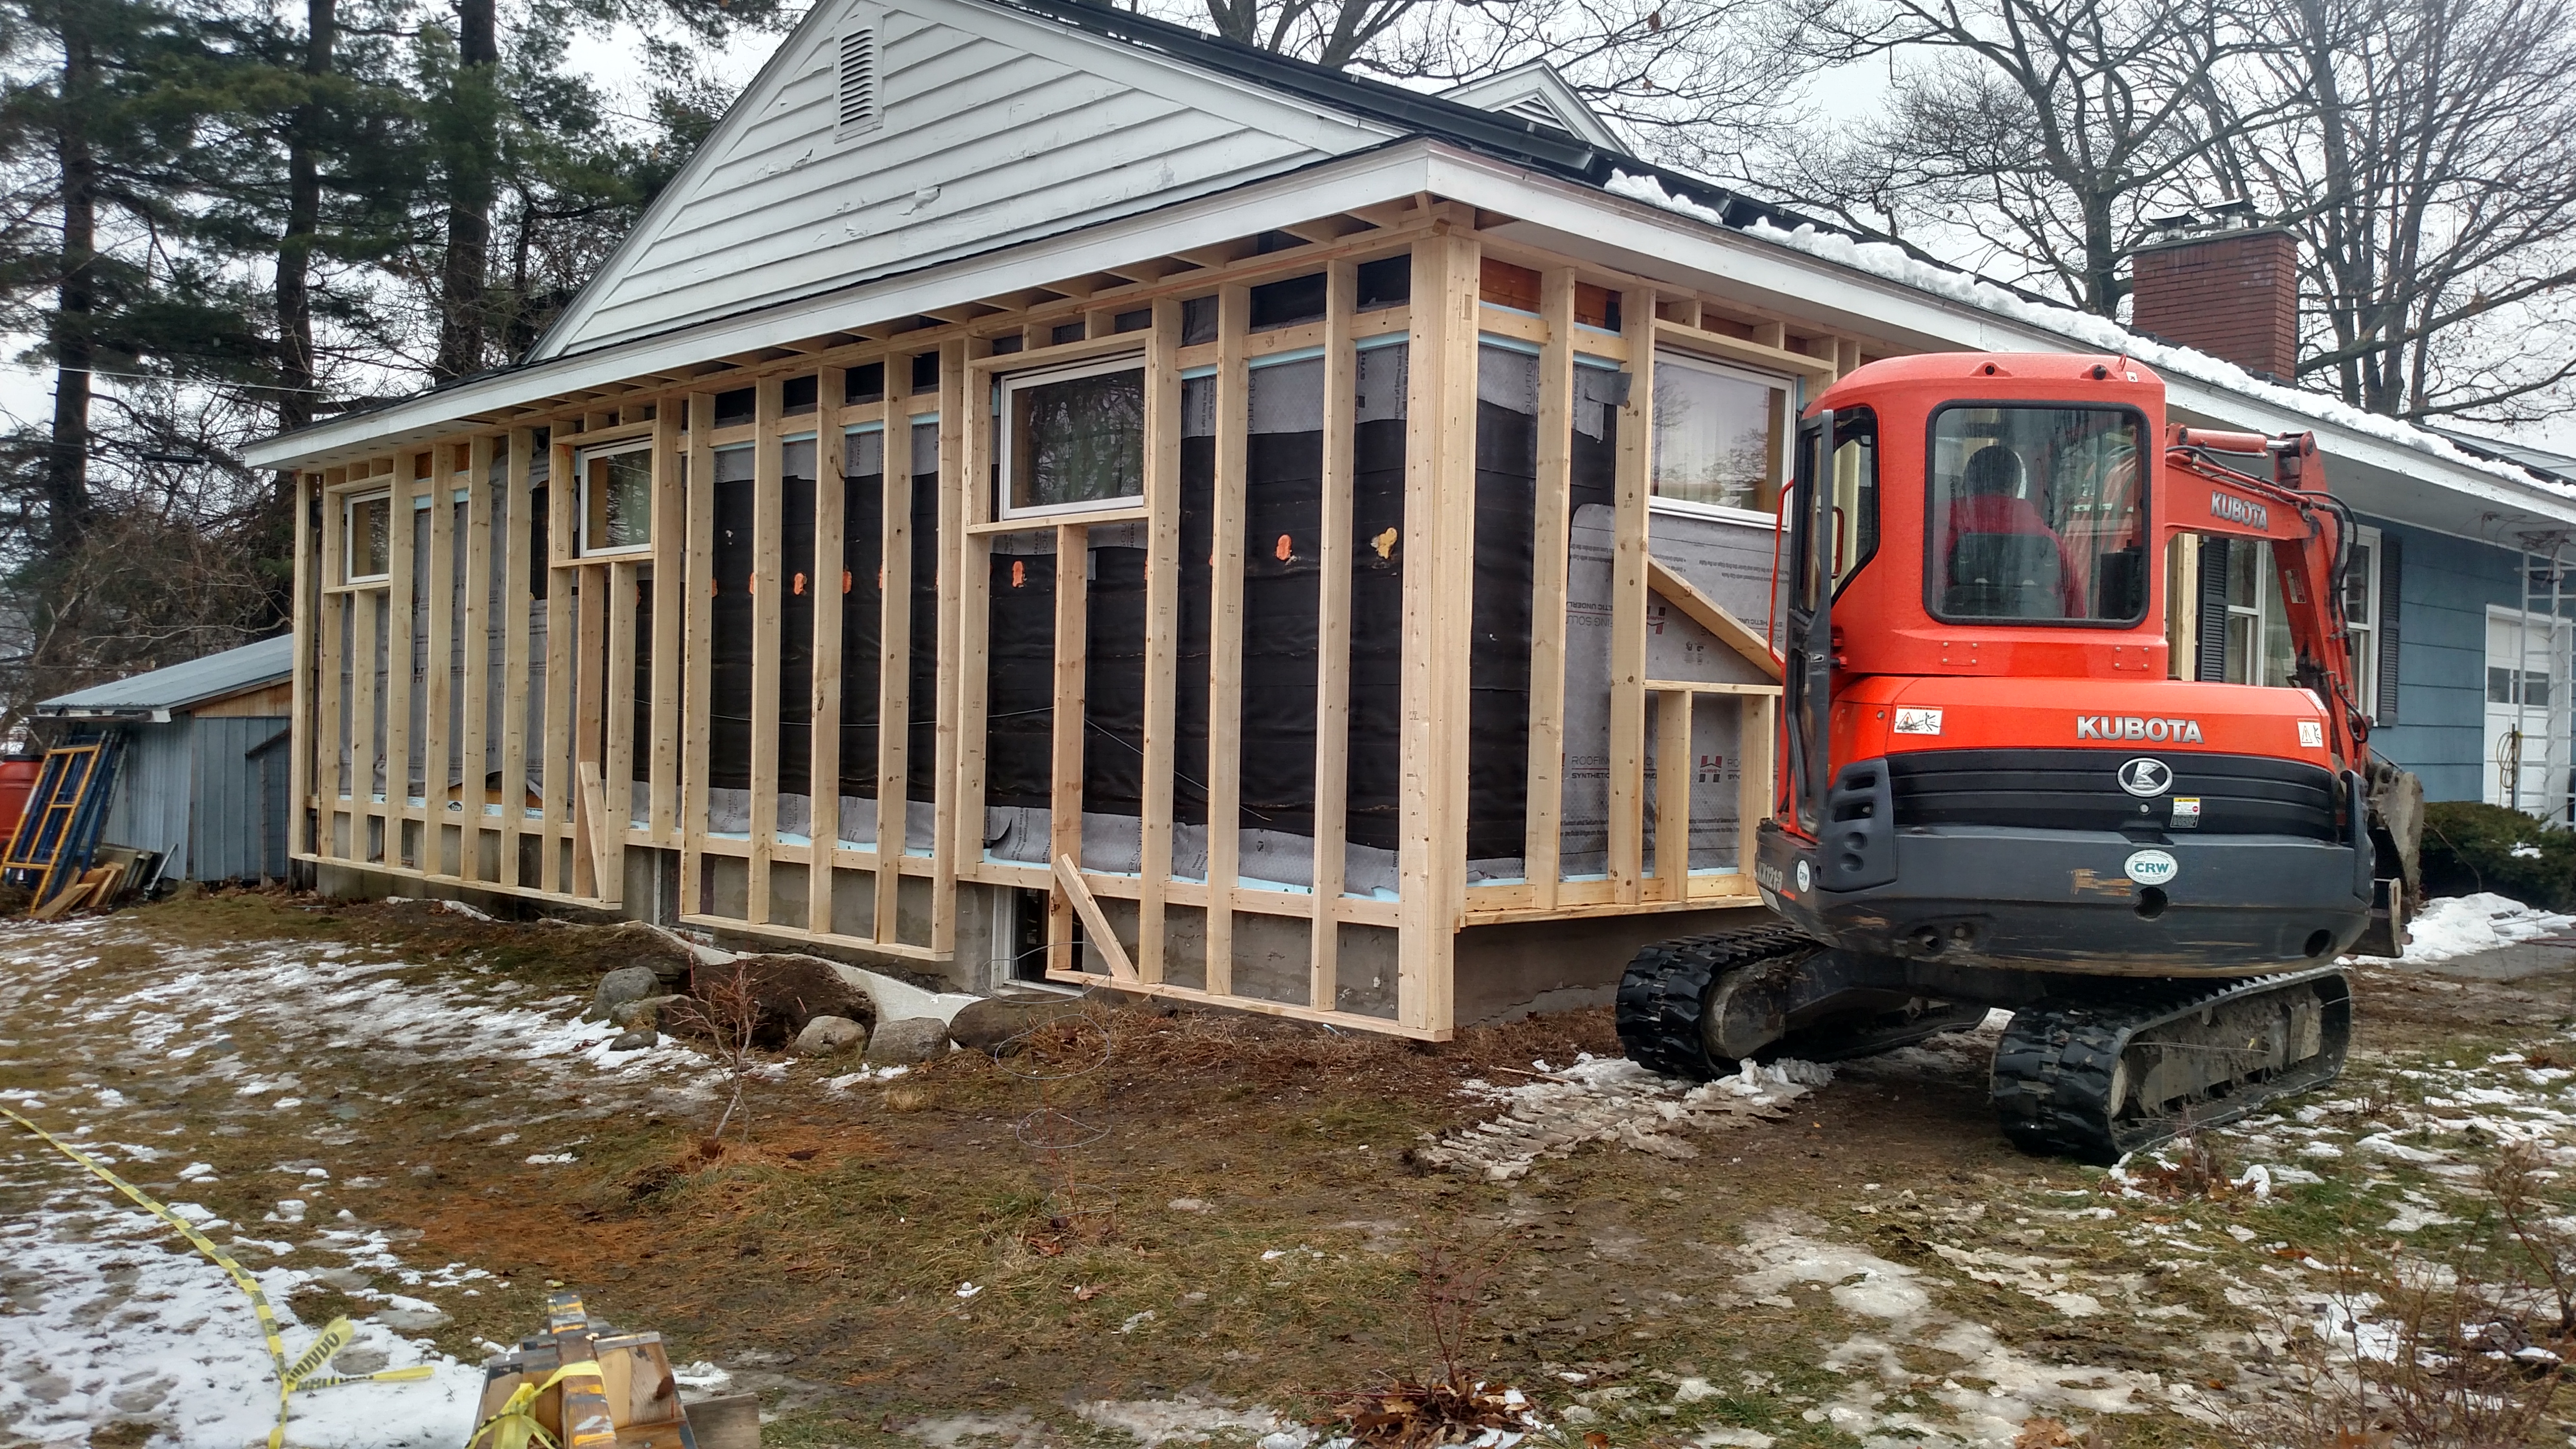
Step Three – New studs are notched to hang on the ledgers.  This makes a super strong wall with minimal fasteners, and no time spent assembling trusses.  On the gable end a small shed roof is constructed to cap the new wall.  One thing I really like about this little roof is it keeps water off the wall, which will help the paint last longer and make sure the windows never leak.

img_20170119_091825304_hdr

The walls have been thickened out with a 2X6 spaced off the wall by 1.5″. The two eaves have been connected with a tiny shed roof to cover the thickened wall. Here you can see the tar paper that was behind the siding, but this paper will be removed so the spray foam can adhere directly to the sheathing.

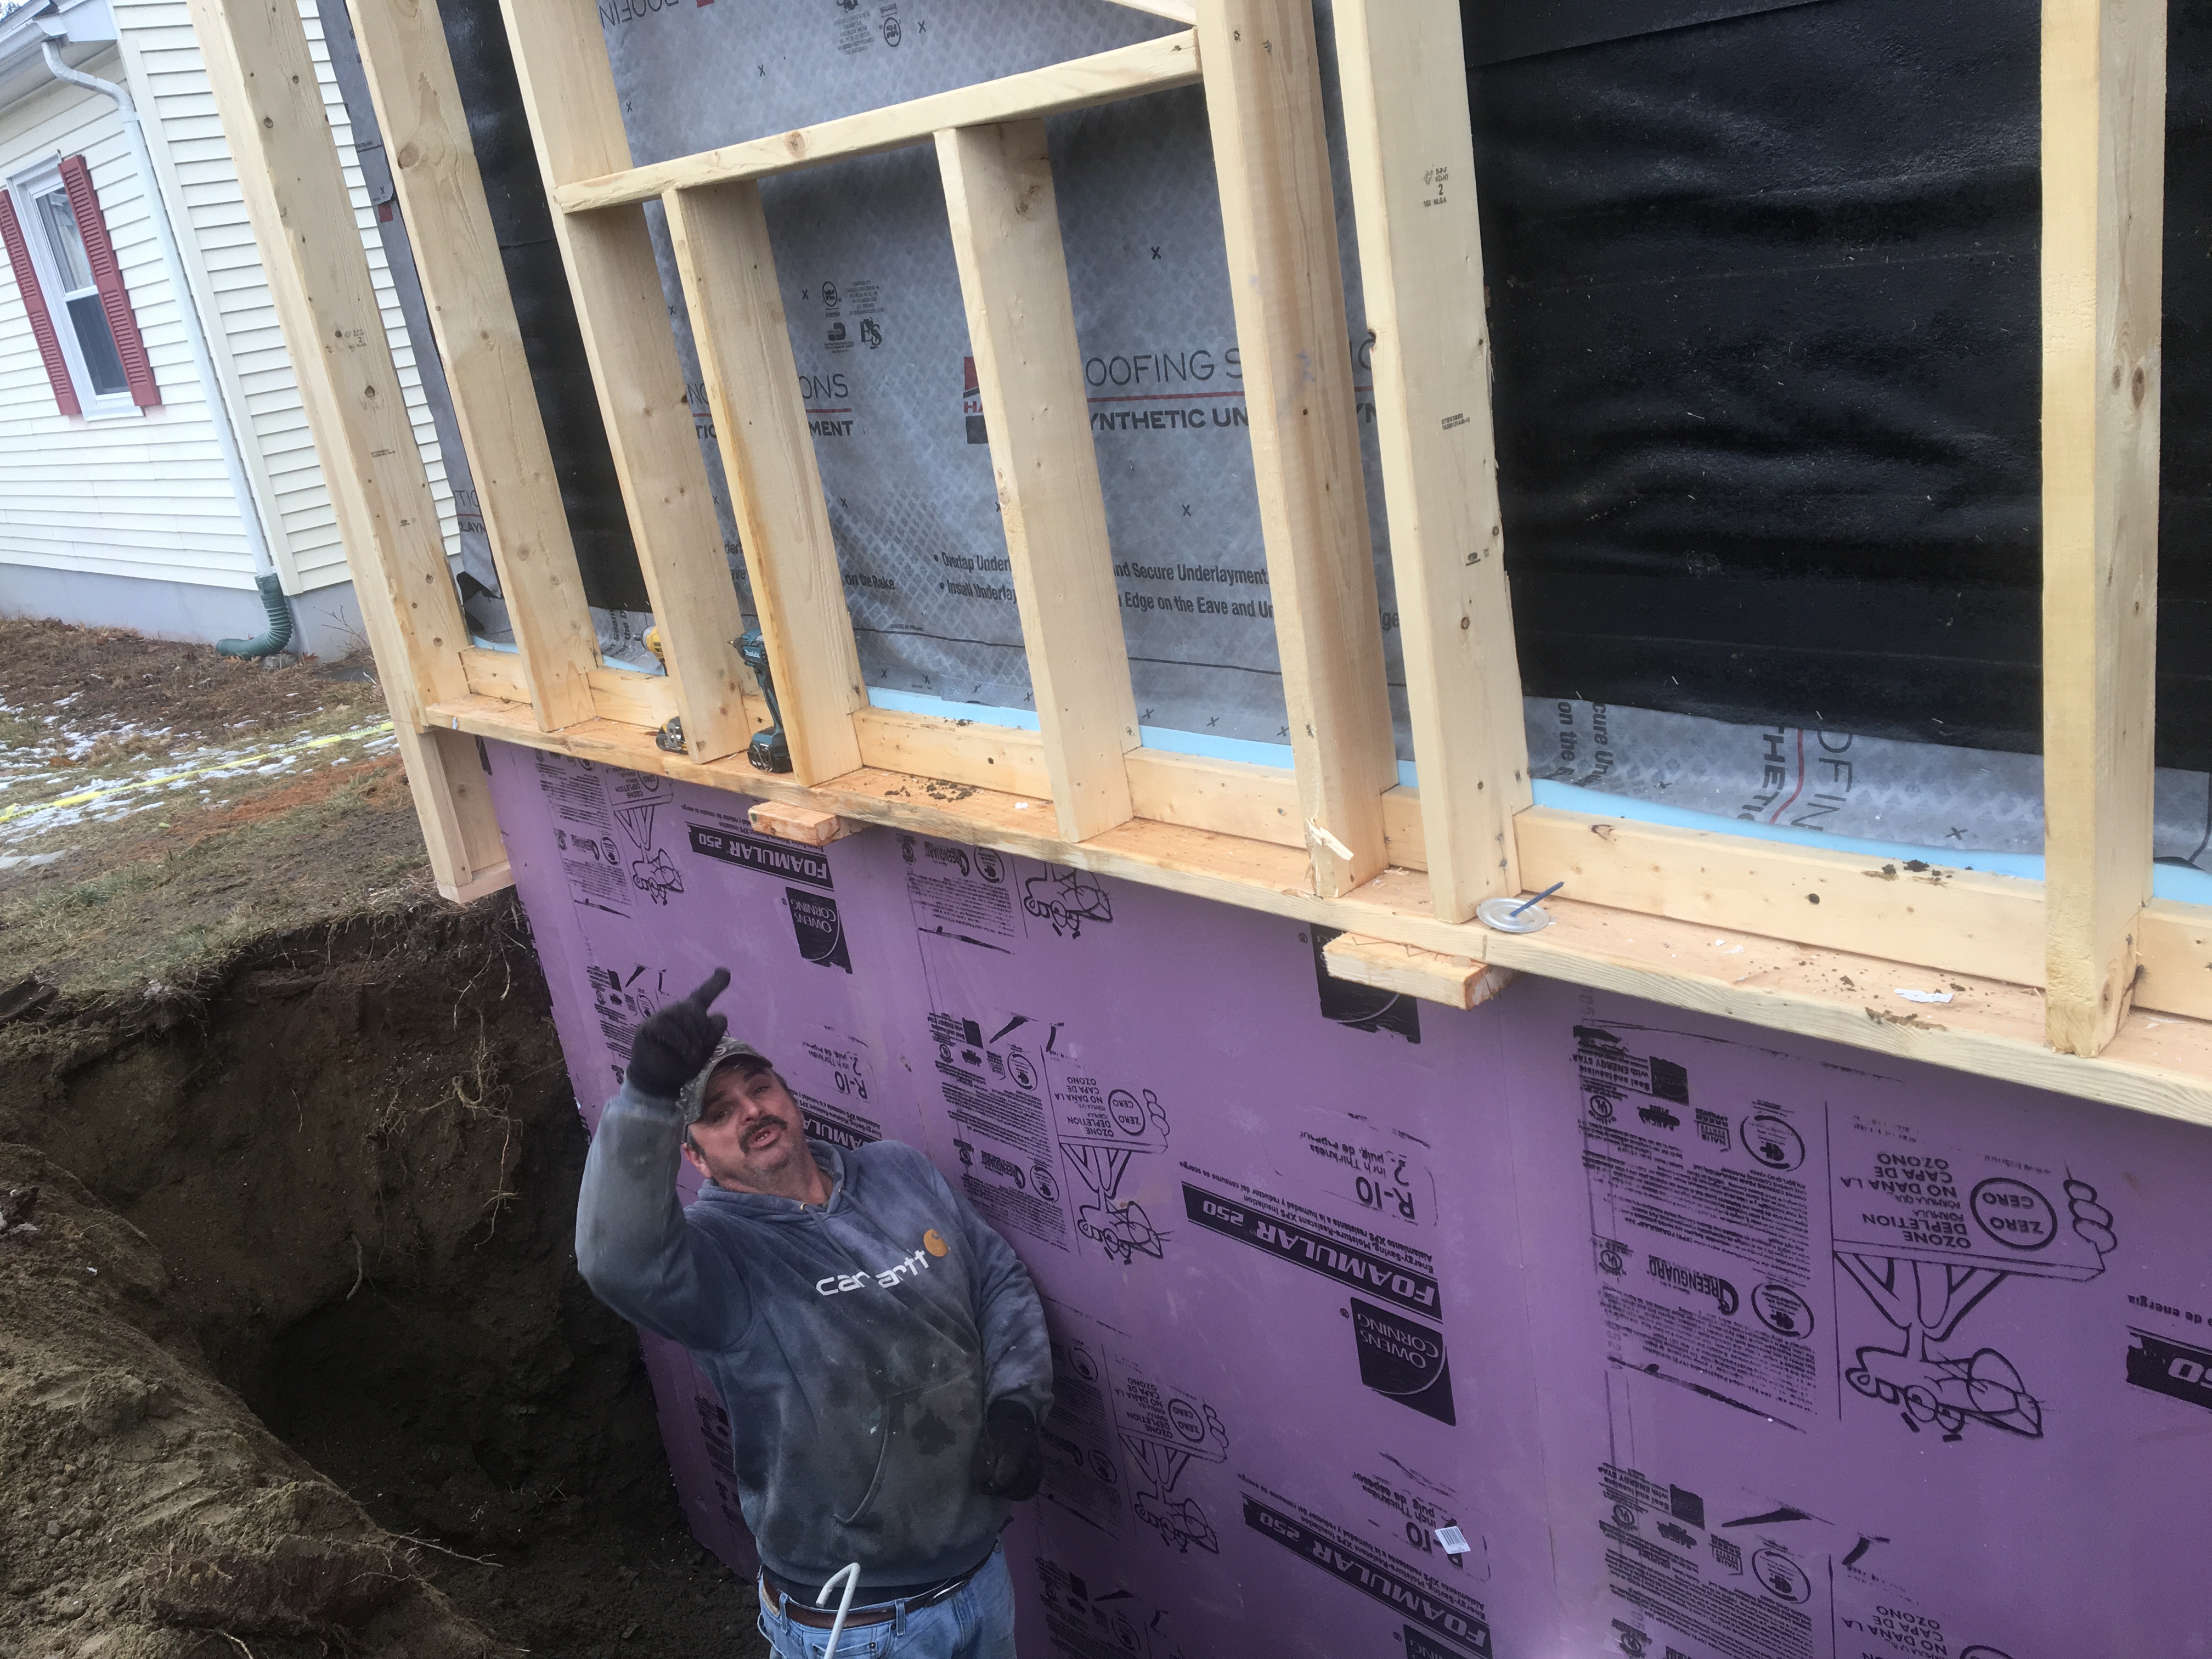
Step Four – At this point work on the wall is stopped while some excavation happens.  The basement under this part of the house is finished with nice knotty pine boards that I don’t want to remove, so we had the foundation wall dug out and insulated on the outside (4″ of extruded polystyrene – R-20).  Ed designed the whole thing so the foundation insulation would butt up- and get glued to the foam board behind the lower ledger.  We’re also enlarging two windows in the basement for egress and to improve daylighting down there.  Ed cut out the foundation wall and framed in the new window to be flush with the outside of the foundation insulation.

img_2215

Foundation insulation on the outside keeps the basement walls nice and warm, avoiding summertime condensation. The pink insulation aligns nicely with the blue insulation peeking out behind the lower ledger.

Step Five – One inch of high density spray foam is applied to the original sheathing of the house: behind studs and over ledgers.  This air seals the wall and provides a vapor diffusion retarder.  To keep moisture inside the house from working its way out to the new sheathing this layer should be 2″.  But I wanted to keep foam to a minimum and I’m pretty sure there’s oil paint on the inside of the walls, and that will do a pretty good job of keeping moisture out of the walls.  By all rights this should be attended to seriously, but this is my house and I’m willing to take the risk because I think it’s quite low given the whole wall assembly.  I also know that I will keep humidity inside the house under control. There are a lot of things that contribute to whether or not a wall manages moisture well and I feel good about this design.  In other circumstances, 2″ of high density spray foam is smart.

img_20170123_151912035

Spray foam on walls gets between the studs and the old sheathing, making sure the insulation is not interrupted anywhere. At this point in the construction the house has suddenly gotten much more air tight. It’s been warm, but I’m expecting to really tell the difference during the next cold snap.

The original sheathing on the house is 3/4″ planks.  Gaps have opened up between the planks as they have shrunk, so the spray foam is making a big difference in the air tightness of the wall.  There’s a lot of chatter about where this air tight layer should be in a thick wall.  Having it in the middle, with insulation to the inside and the outside, is a little unusual, but I think it’s the best place.  All the insulation to the outside of the original plank sheathing keeps it warm so it won’t support condensation in cold weather. Applying an air barrier and vapor diffusion retarder at that surface keeps moisture from getting into the outer wall and that avoids condensation on the outer sheathing.  I had wanted the air barrier and vapor diffusion retarder to be a peel-and-stick membrane (like Grace Ice and Water Shield), but because of the irregularity of the plank sheathing my builder wasn’t comfortable with that.  And that’s how I ended up with foam in the wall.

Step Six – Time to make a mess inside.  Windows are removed from the original wall and replaced to the outside of the new wall.  The windows were new about 15 years ago and they’re pretty nice.  We’re keeping them except in the places where the windows are being enlarged for more sunlight and egress.  OSB sheathing is installed all over the wall.  The space behind the OSB is 7″ (5.5″ for the “studs” and 1.5″ for the foam board; the ledger is notched into the “studs” so it doesn’t add any thickness).  The remaining space is filled with cellulose, so total insulation is 1″ spray foam + 6″ cellulose = R-28.

All the rest is siding and trim.  Lots of folks want to know how much this is costing, and is it “worth” it.  I won’t know total cost for a while, but I’m guessing about $30,000.  We could have gotten another heat pump for less than $6000.  But we wouldn’t have new siding out of that, or egress windows in the bedrooms, or a warmer basement…  How much is comfort worth?  And how comfortable will the bedrooms really be?  Time will tell. Even Nik, with his preference for mechanical solutions, admits that he can feel a difference in the bedroom, and I think I detect a note of appreciation.  We’re only insulating two walls: the ones furthest from the mini-split and woodstove.  That keeps cost down and focuses our efforts where we need to improve comfort.  So, worth it..?  I know some would say no.  For me, there are benefits that can’t be monetized, and obviously my answer is yes to the wall.

Older Posts »

Categories